



This is Part 2 of a collaboration with Timo Mason from Write Your Way to Wealth. In Part 1, Timo walked through his full 8-step AI workflow for writing and publishing Substack articles, including the exact tools he uses at each step and why. If you haven’t read it yet, start there first.
The problem Timo ended with: his tools don’t talk to each other. He is the one doing all the connecting. That costs 10-15 minutes of copy-paste friction per article, and produces output that varies in tone because each project carries its own context.

This article is the fix. By the end, you’ll have a clear blueprint for collapsing Timo’s 8-step workflow into one Claude Cowork agent using a 4-layer architecture, including the exact files to create and the order to build them.
The problem isn’t that you’ve built too many Claude projects. The problem is that you’re still the one doing the handoffs between them. A unified content agent doesn’t just consolidate your tools. It handles every handoff, so you can focus on the writing only you can do.
Part 1 Recap: What Timo’s 8-Step Workflow Actually Looks Like
Timo covers this in full in Part 1. Here is the short version.
Eight steps, five tools: Claude Article Architect project for outlining and drafting section by section. A Substack Internal Linker skill connected to his Notion article database for internal link suggestions.
A Product CTA Linker that finds placement spots and auto-generates UTM-tracked product links. Headline Hero for title options. A separate ChatGPT GPT for Substack Notes. Another GPT for thumbnails.
Each step works well on its own. Timo was honest about the gap at 2:46 in the recording:
“I’m practical and not over-optimizing and just do the copy-pasting for two seconds.” - Timo
The copying is not what is slow. What is slow is the context reset. Every tool switch means re-explaining your article from scratch.
Every project change means losing the accumulated understanding the previous tool had built up. Multiply 10-15 minutes per article by five publications per month and you have lost over an hour. Not to writing. To tool management.
That is exactly what the agent removes.
👋 Julley, I’m Dheeraj and I’m an AI systems builder.
I build production-grade AI systems at work by day and ship my own products by night (9+). This newsletter is the bridge between those two worlds. Every system, every build, documented step by step.
Join 1,300+ builders getting the exact AI setups, prompts, and production configs that actually work in your business.
Why Claude Cowork Is Different From Claude Projects
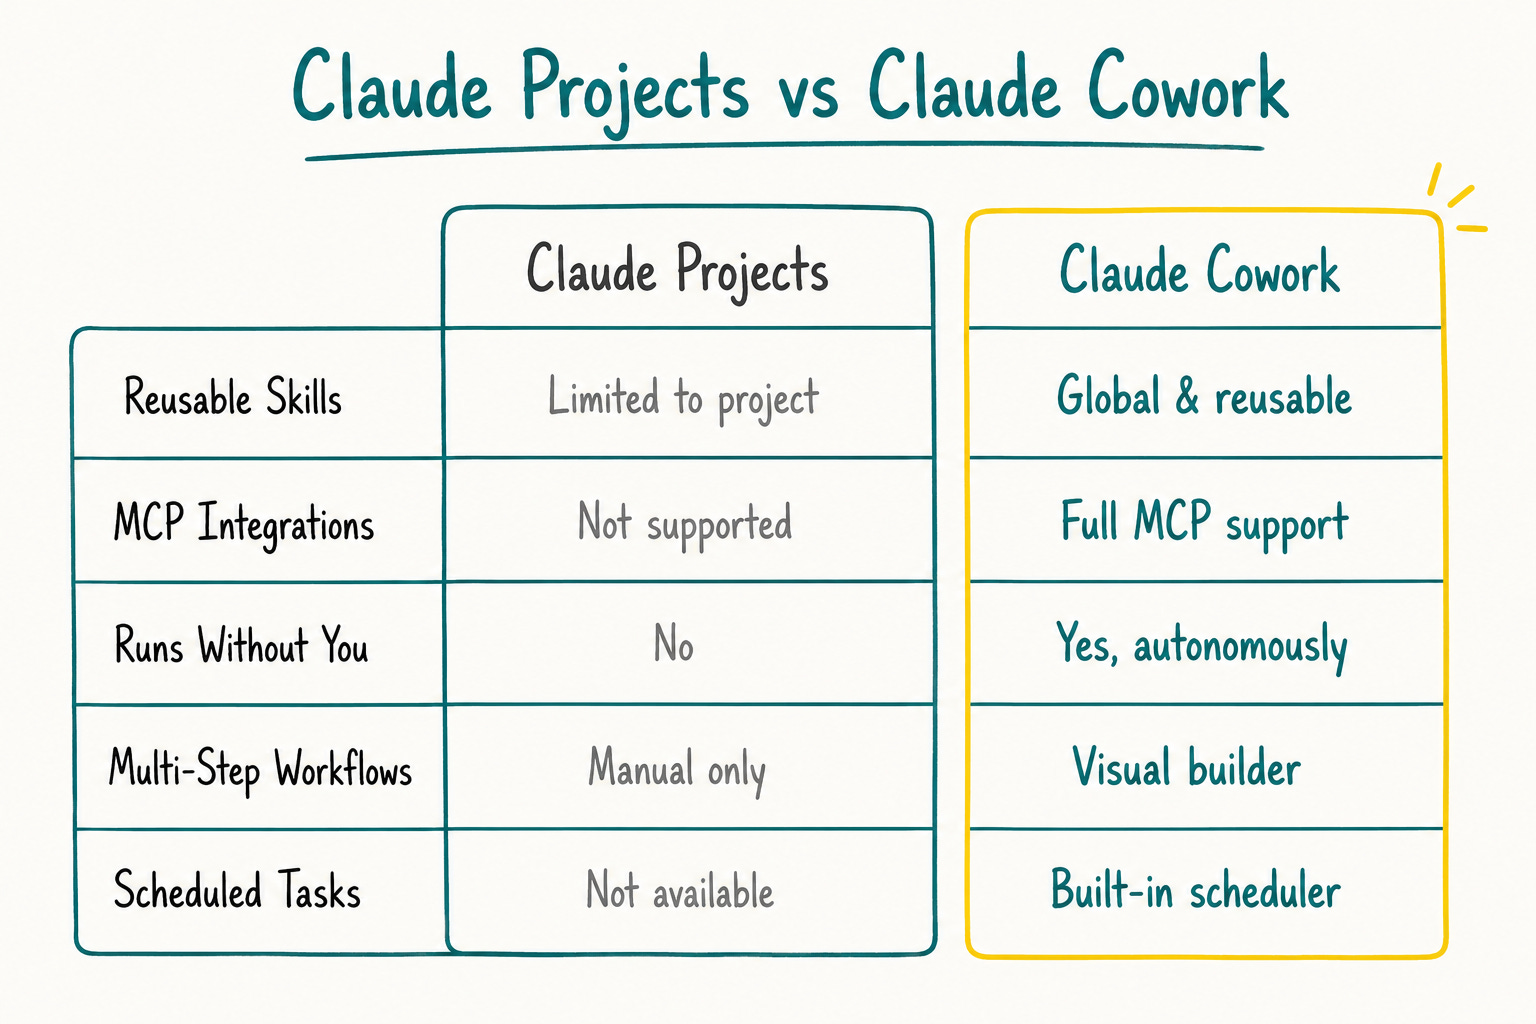
Claude Cowork is the agentic upgrade to Claude Projects. Projects give you a persistent workspace with a system prompt and knowledge base.
Cowork adds multi-step workflow automation, external integrations via MCP servers (like Notion and Substack), reusable skill modules shared across all projects, and scheduled task execution triggerable from mobile.
As of May 2026, Cowork is Claude’s answer to the orchestration problem that Projects leaves to you.
Here’s what that difference looks like in practice:
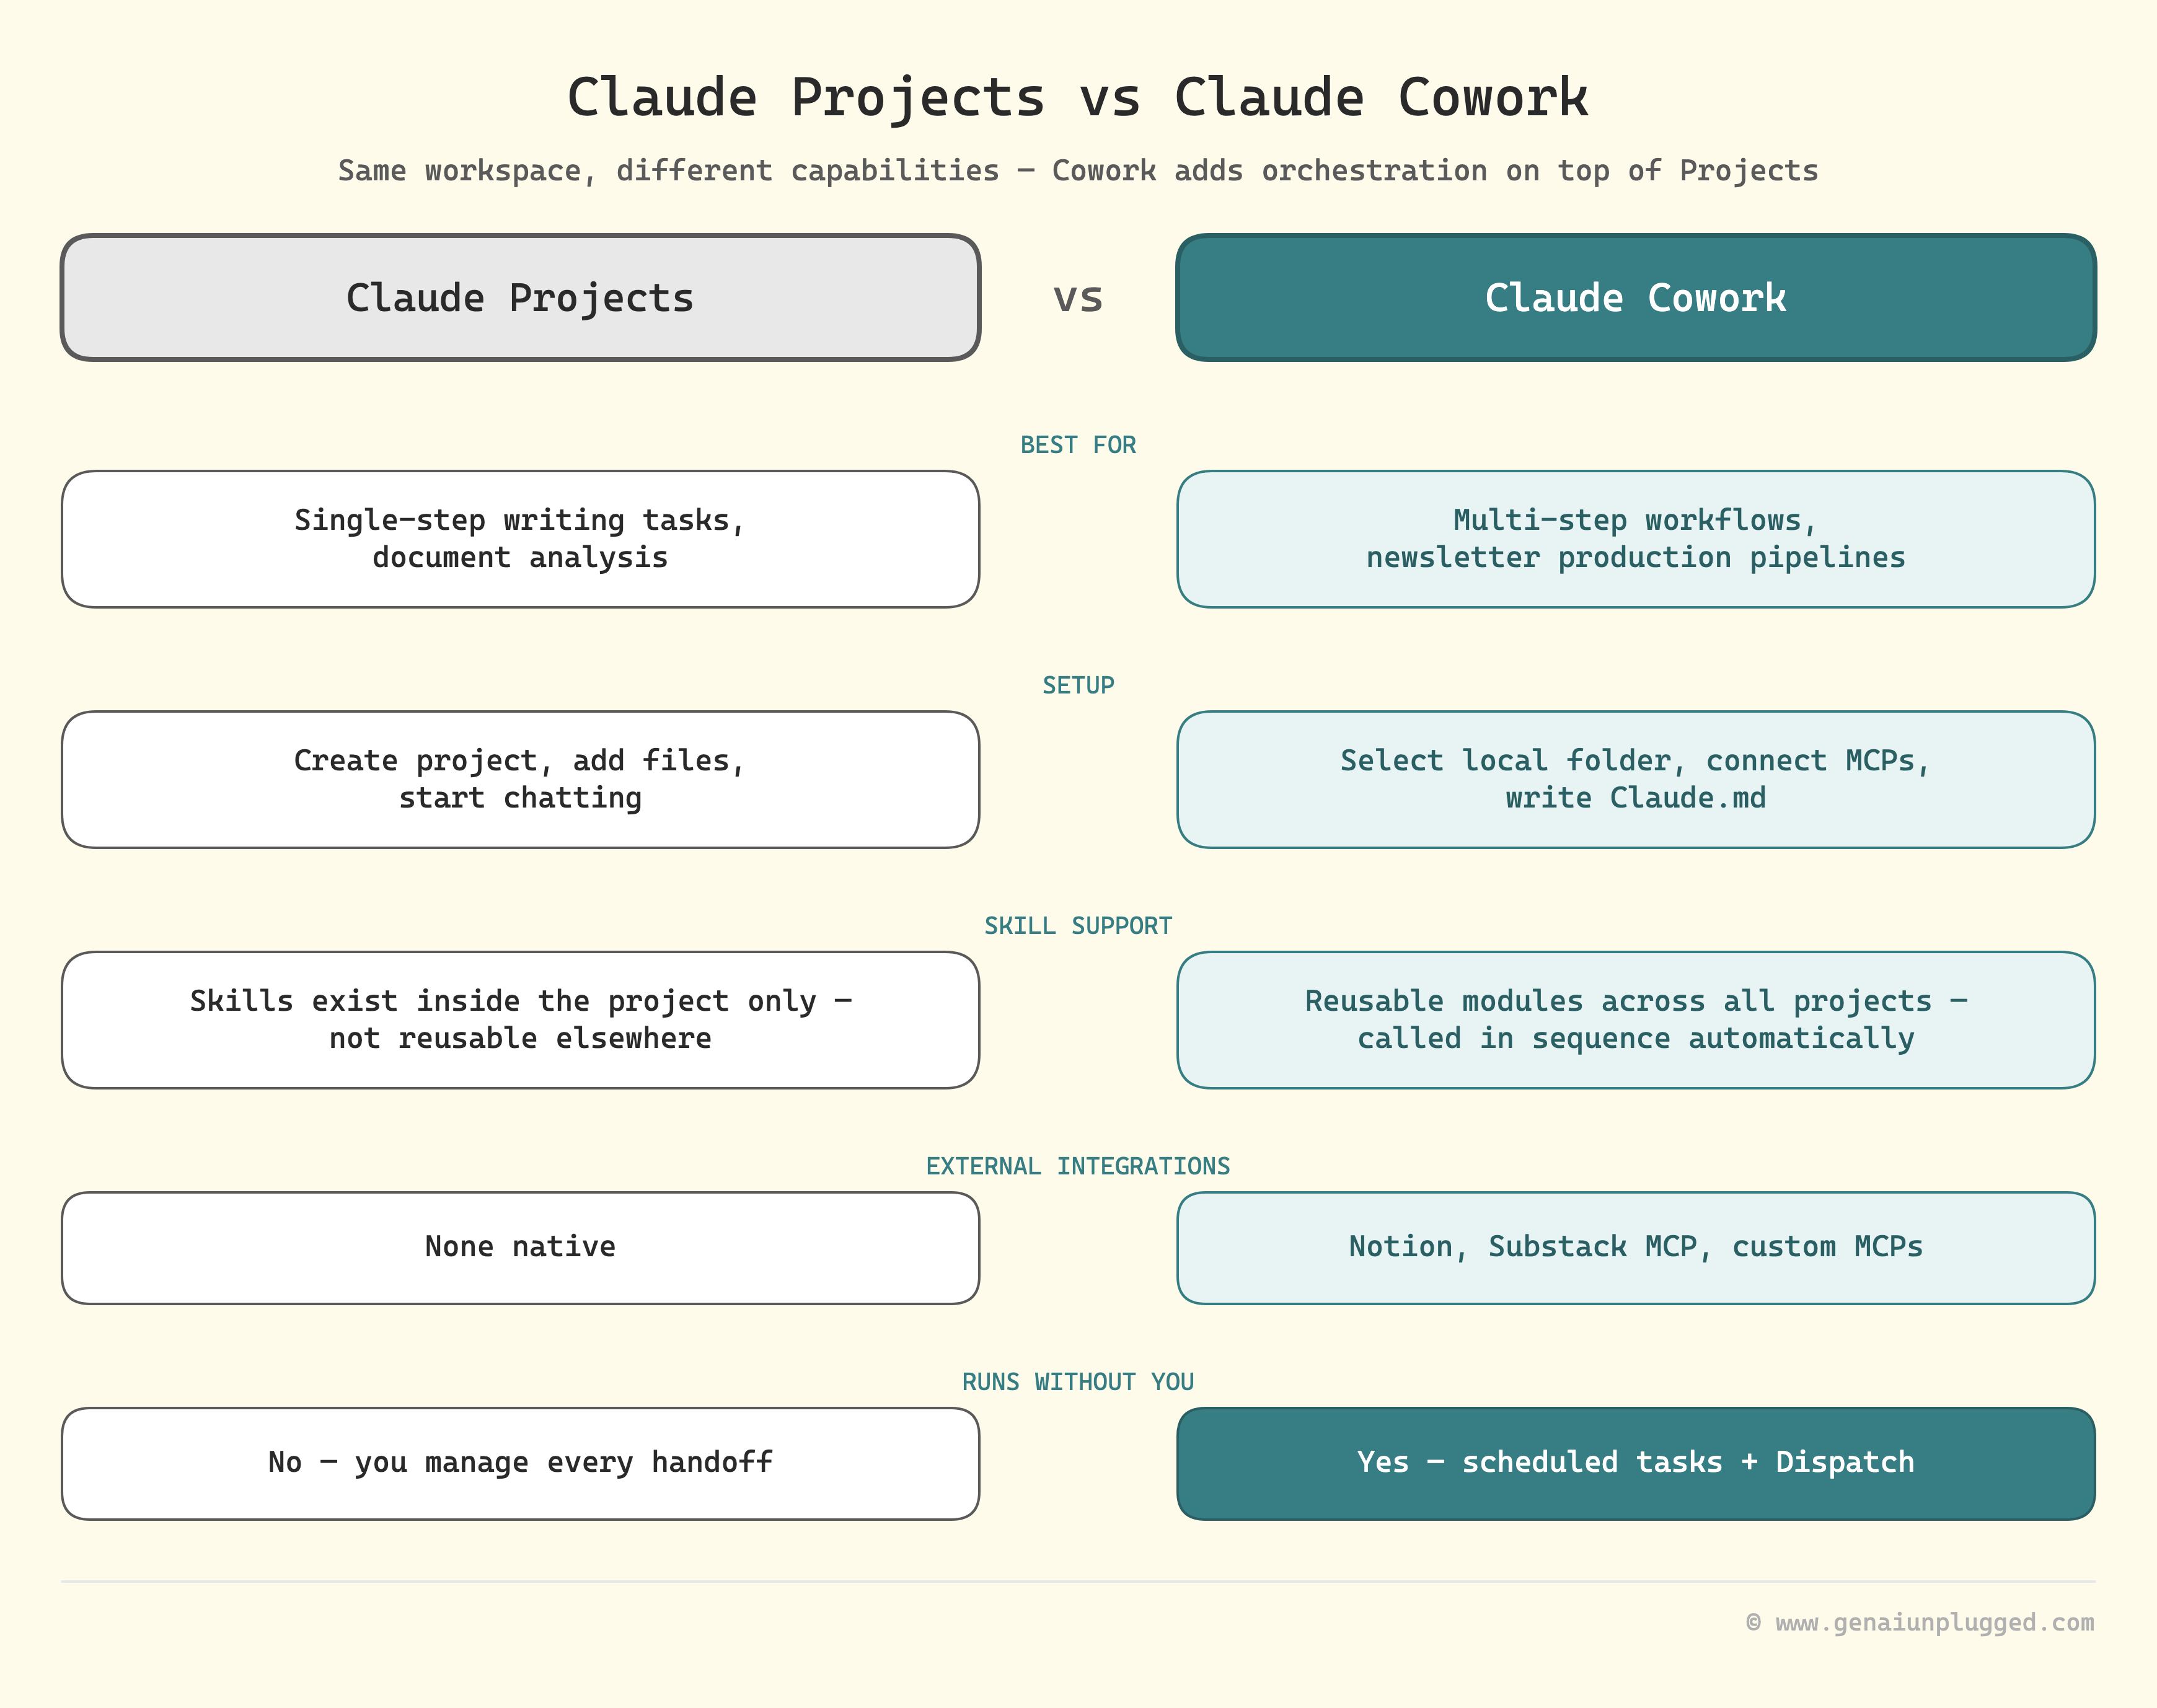
Claude Projects
Best for: Single-step writing tasks, document analysis
Setup: Create project, add files, start chatting
Skill support: Skills exist inside the project only
External integrations: None native
Runs without you: No
Claude Cowork
Best for: Multi-step workflows, newsletter production pipelines
Setup: Select local folder, connect MCPs, write Claude.md
Skill support: Skills are reusable modules visible across projects
External integrations: Notion, Tavily, custom MCPs
Runs without you: Yes, via scheduled tasks + Dispatch
Timo’s skills (Internal Linker, CTA Linker) currently live inside his Article Architect project and can’t be called from anywhere else.
In Cowork, they become reusable skill modules in Claude: any project can call them, and the unified agent orchestrates them in sequence without manual triggering.
At 49:30 in the recording, I walked through a live Cowork setup with Timo, creating a project from a local folder in a few clicks.
Commercial break: Claude Code Builder cohort
The founding batch of my Claude Code cohort starts June 20 on Maven. Six live Saturdays. You bring your business problem, we build the system.
Only 12 Seats. When they’re gone, the founding price ($797) closes and Cohort 2 opens at $1,597.
Use code GENAI20 for 20% off. Expires June 19. Check the Syllabus →
How Does the 4-Layer Agent Architecture Work?
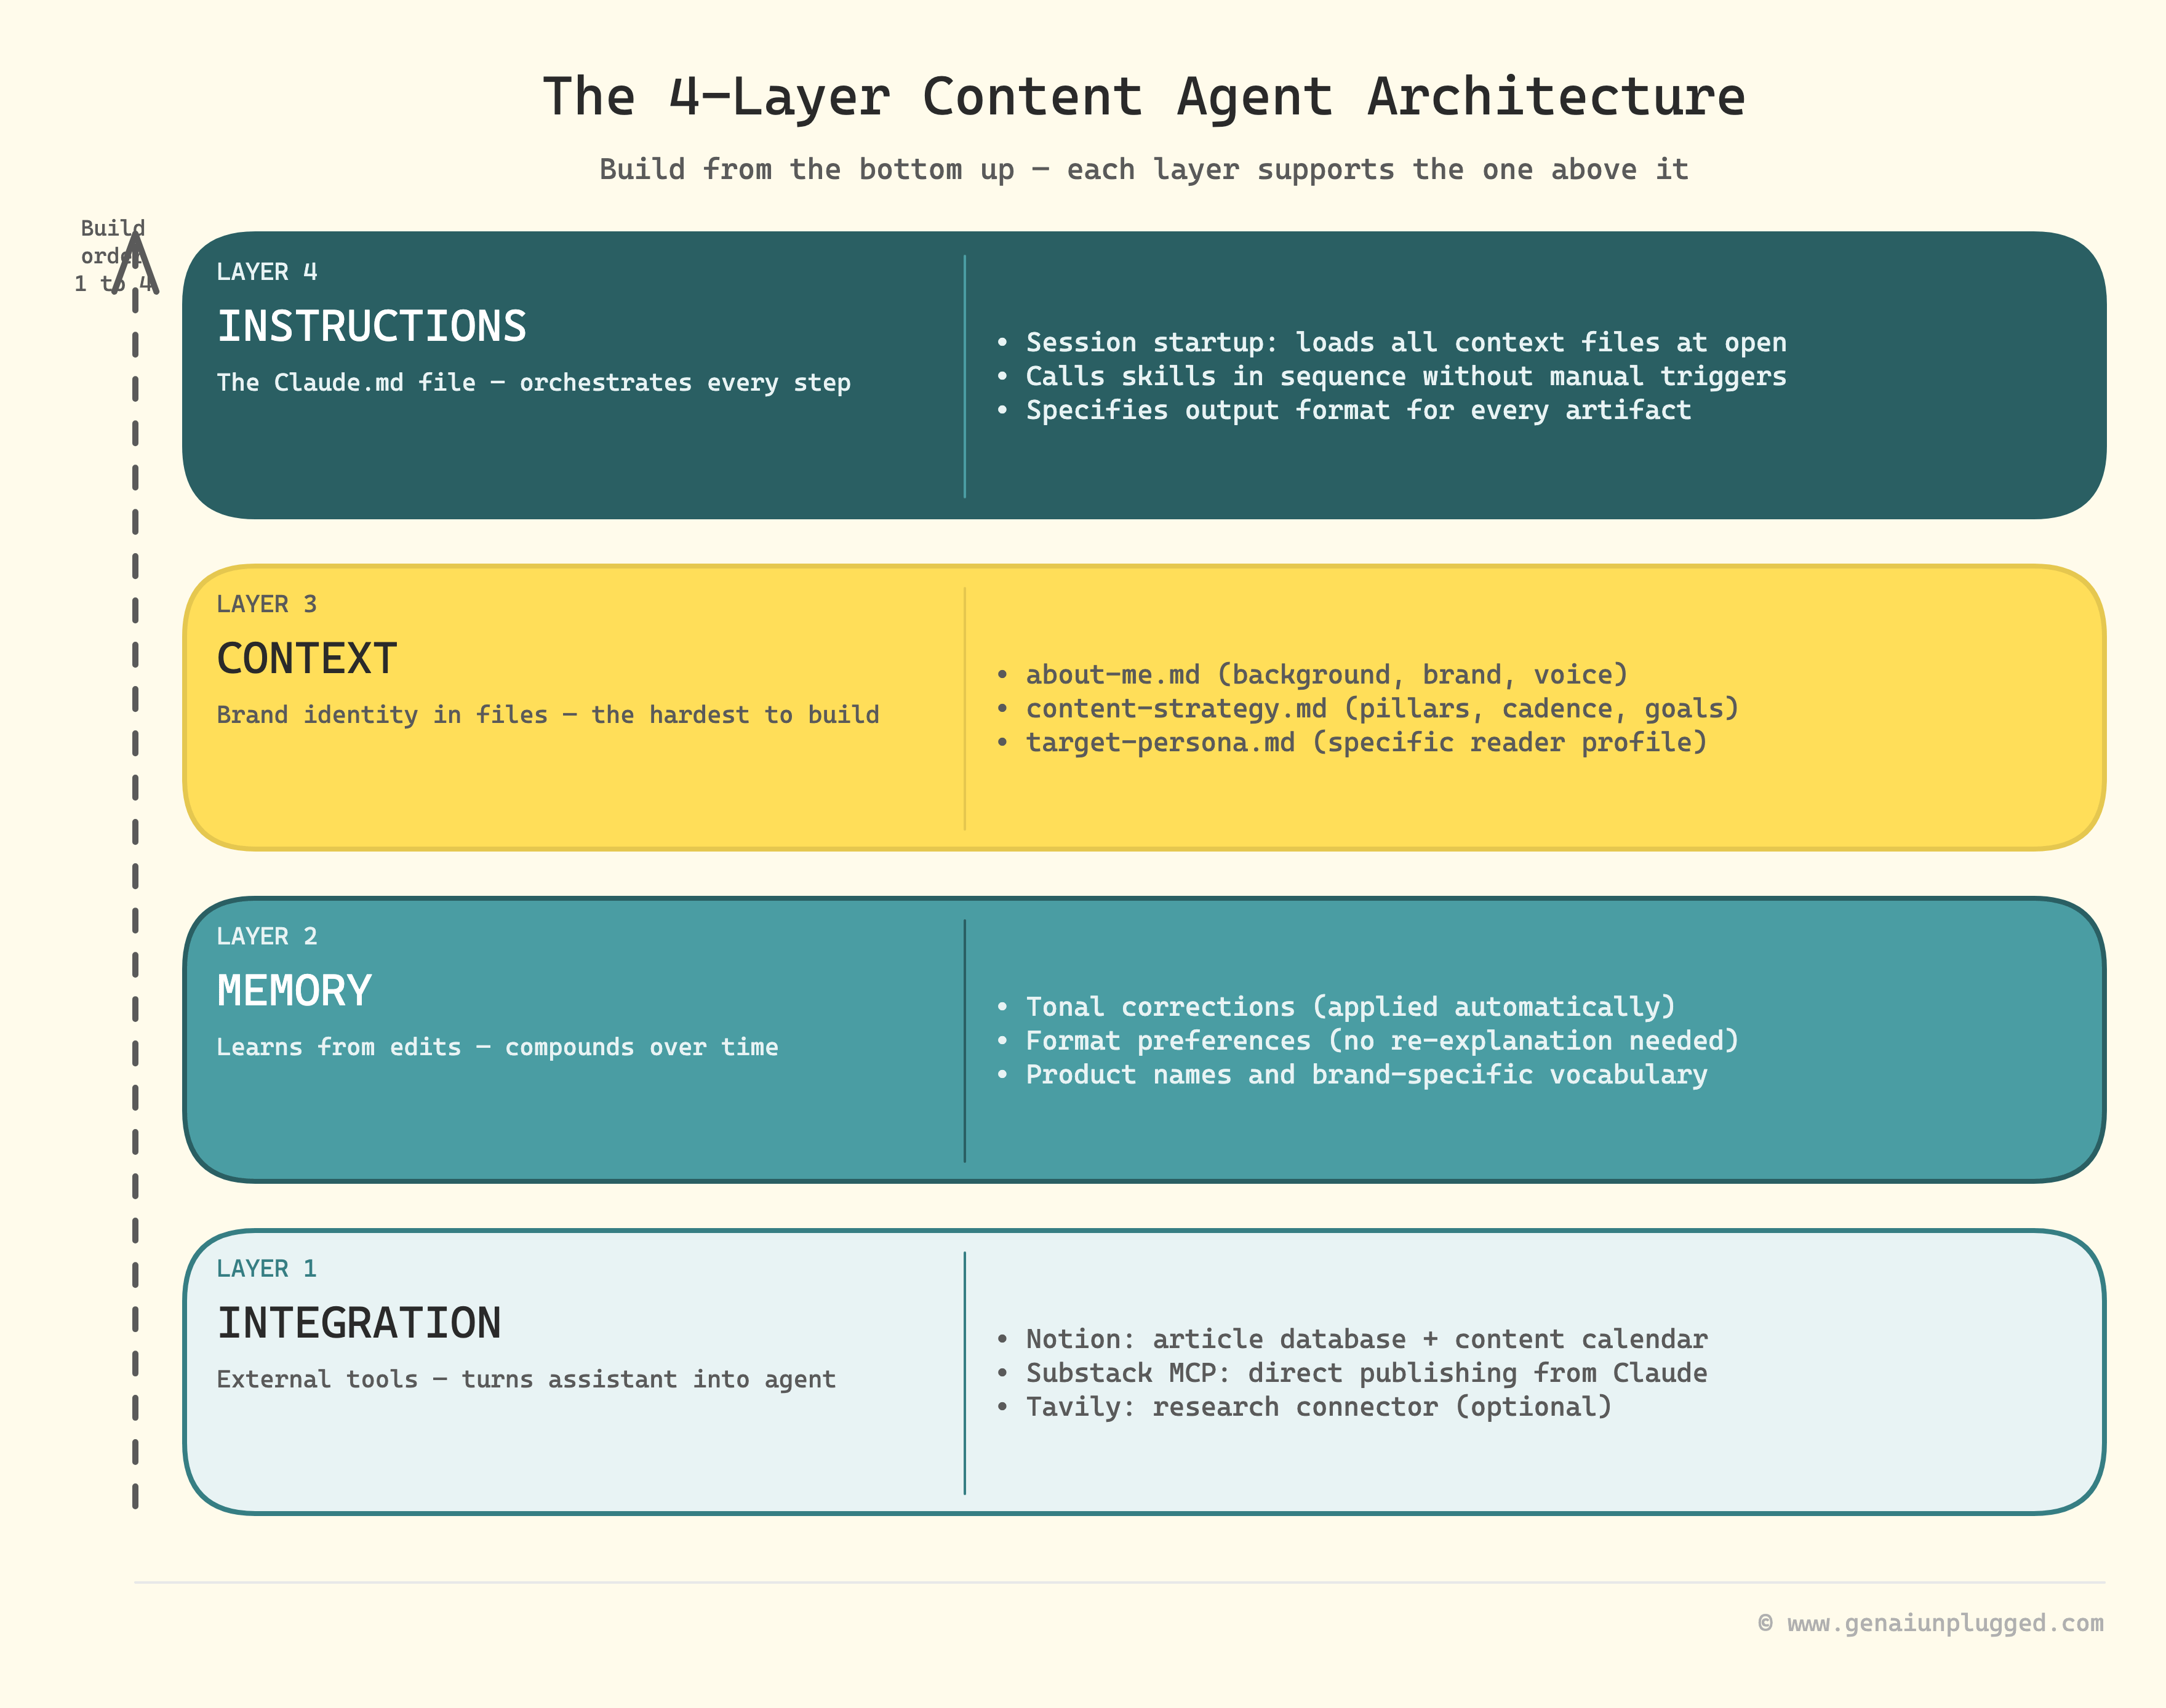
The 4-layer architecture organizes a content agent into four components: Integration (external tool connections), Memory (learned corrections over time), Context (brand identity files that inform every output), and Instructions (the Claude.md file that orchestrates each step).
Build them in this order. Each layer depends on the one below it. The full setup takes three to five hours the first time, and it compounds with every article after.
In Part 1, Timo described three of these layers: Integration, Context, and Instructions.
Memory is the fourth. It is what makes the agent improve over time without re-explanation, and most people skip it initially and add it once the other three are running. Here is what each layer contains.
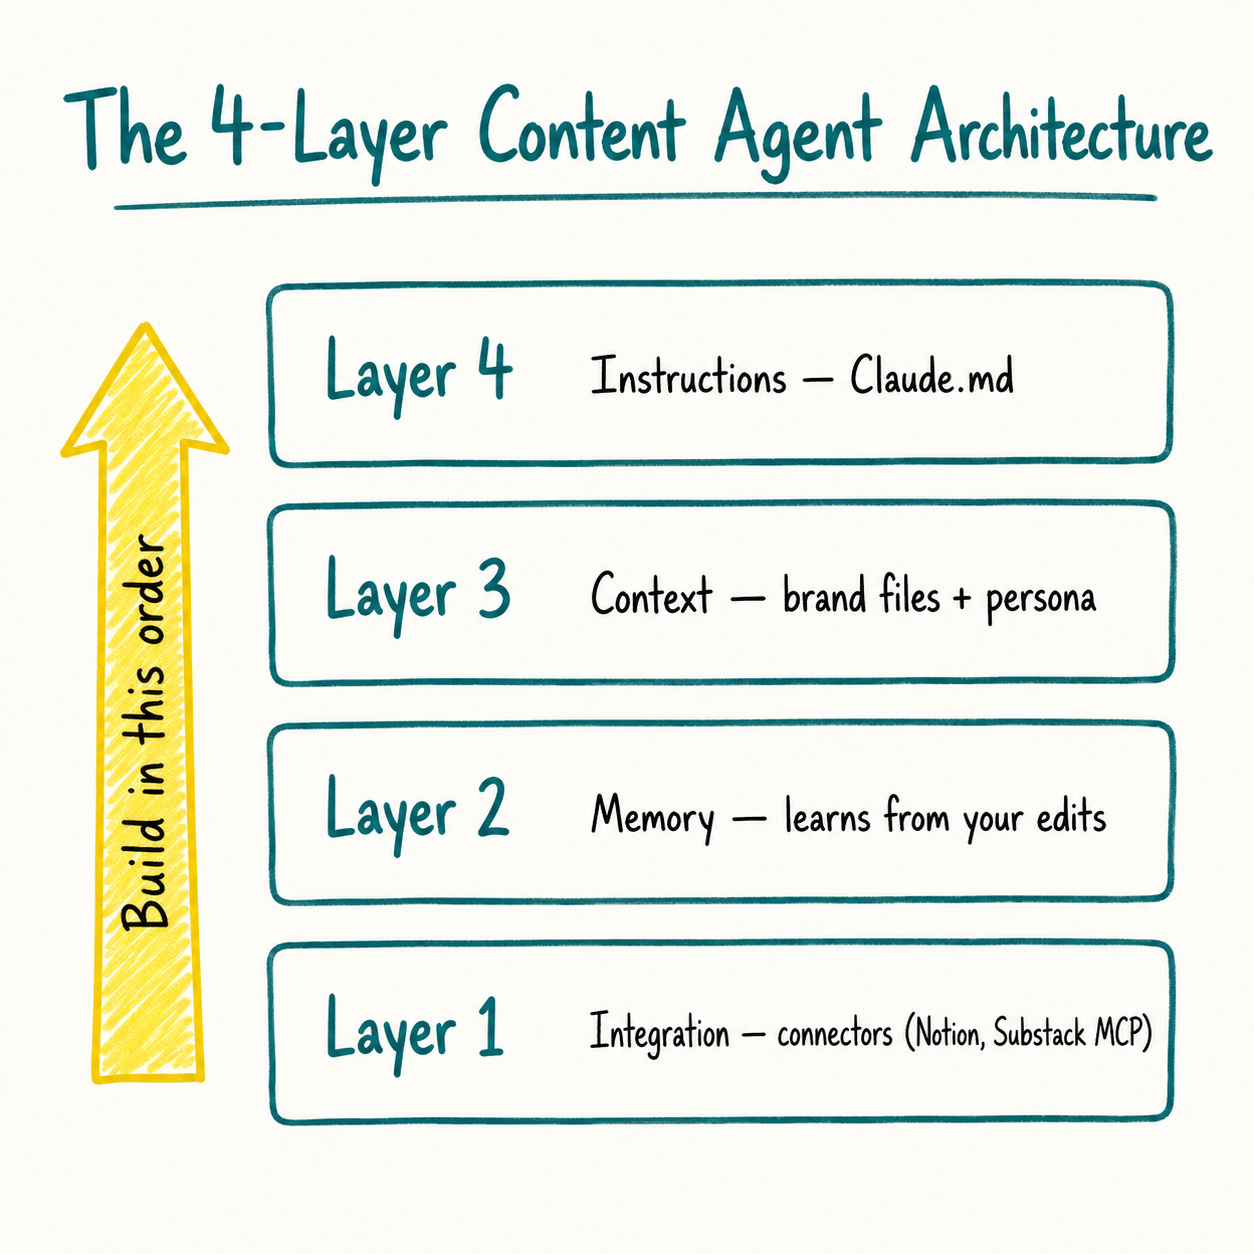
Layer 1: Integration (the connectors)
This is where your external tools connect. For a Substack creator, the minimum useful set is Notion (for your article database and content calendar) and the Substack MCP (for direct publishing).
Research tools like Tavily live here if you have a research phase. If you don’t, like Timo, you skip them. The integration layer is what separates an AI assistant from an AI agent (software that acts on your behalf without step-by-step prompting). An assistant waits for you to paste things in. An agent fetches what it needs.
Layer 2: Memory and Knowledge
The memory layer is where the agent learns from your edits over time. When you consistently change the same thing, whether it’s a tonal pattern it gets wrong, a format you always adjust, or a product name it misspells, the memory layer captures that and applies it automatically to future outputs.
This layer is optional at first, but it compounds. Every correction you make becomes a preference the agent applies without re-explanation.
Layer 3: Context (the hardest part)
Skip this layer and every AI draft sounds like it could belong to any newsletter.
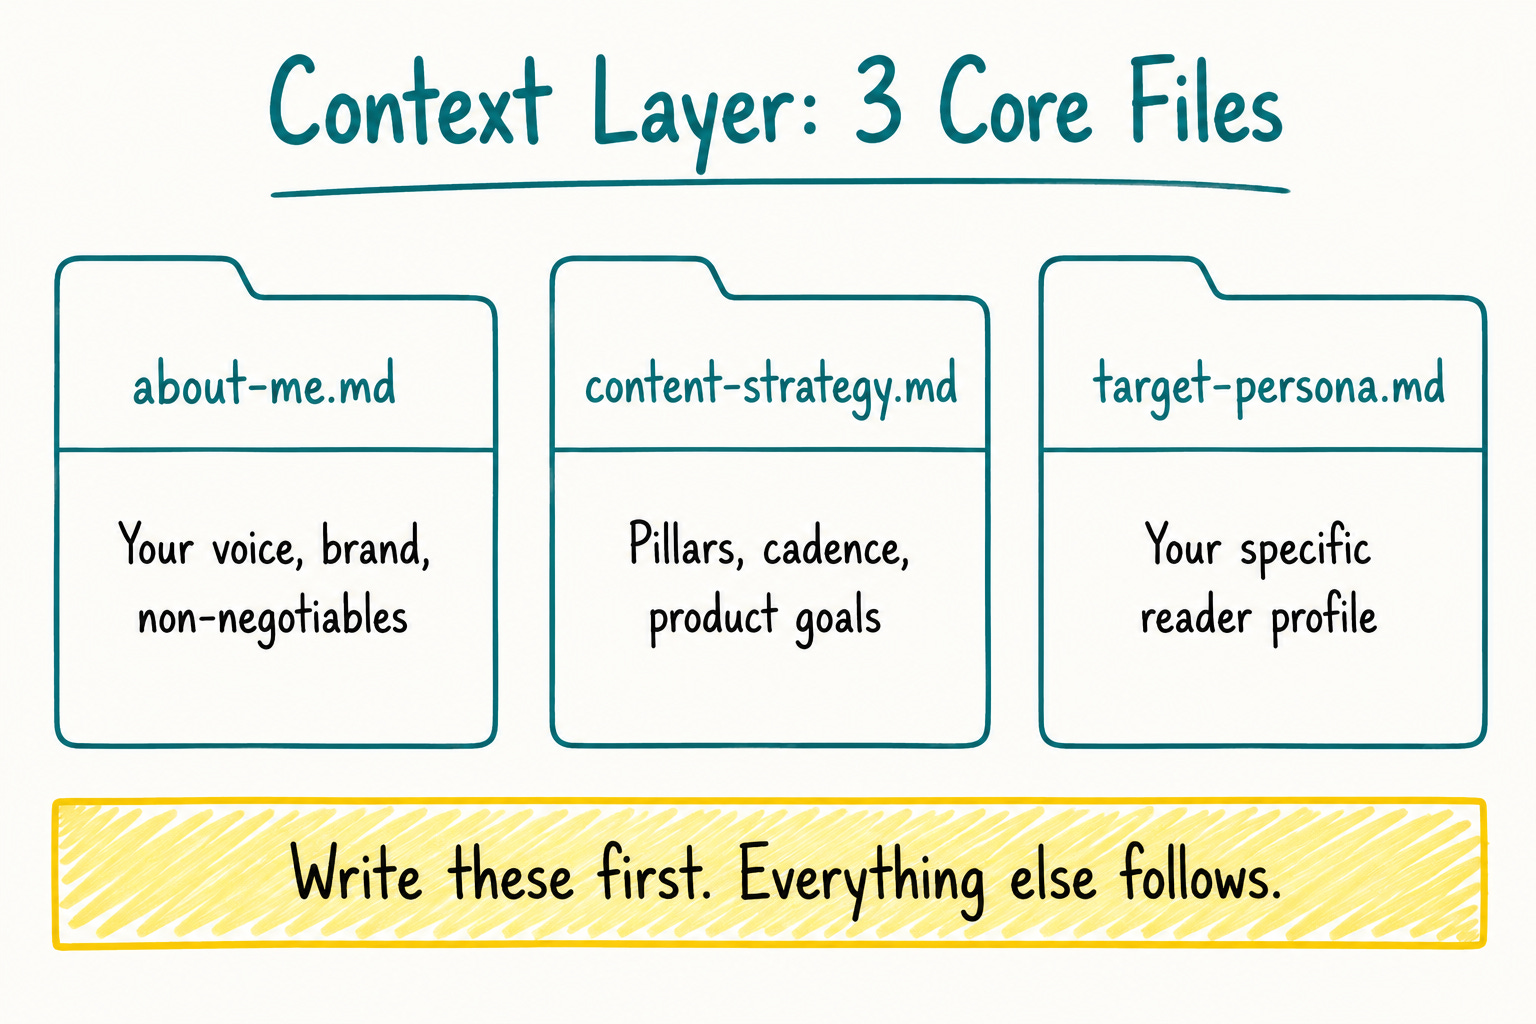
The context layer is a set of files that give the agent specific direction before it writes a single word.
At minimum, you need three files: an About Me file covering your background, brand, and writing voice; a content strategy file with your pillars, cadence, and quarterly goals; and a target persona file describing your reader in specific terms (not “entrepreneurs” but the actual person who subscribes and why).
At 1:04:15, Timo articulated the value better than I had:
“Not just that we save time. If we have the context files very nicely set up, that very much potentially will be a better output.” - Timo
That reframe matters. The unified agent isn’t just faster than the fragmented workflow. It’s better, because every step has access to the full context instead of just what you remembered to paste in.
Layer 4: Instructions (the Claude.md file)
The Claude.md file is the agent’s operating document. It’s a structured plain-English file that the agent reads at session start, and it tells the agent exactly what to do, in what order, calling which skills, referencing which context files. Nothing in this file is technical.
At 38:00, I told Timo: dictate your existing workflow into Whisperflow or Mac dictation, then ask Claude to structure it into a Claude.md file. The more detail you include, the better the agent performs.
A Claude.md for Timo’s workflow would look roughly like this:
# Content Agent. Operating Instructions

## Startup Protocol
On session start:
1. Read about-me.md
2. Read content-strategy.md
3. Read target-persona.md
4. Display: “Context loaded. Ready to begin. What are we working on today?”

## Article Workflow
Step 1. Outline: Ask for topic + angle. Generate outline using [outline-template.md].
Step 2. Draft: Write section by section. Match tone in [example-article.md].
Step 3. Internal links: Run Substack Internal Linker skill against Notion article database.
Step 4. CTA placement: Run Product CTA Linker skill. Auto-generate UTM links.
Step 5. Headlines: Run Headline Hero skill. Return 5 options.
Step 6. Notes: Draft 3 Substack Note variations from final article.
Step 7. Publish: Use Substack MCP to schedule Note and draft post.

## Output Format
- Article: Google Doc export format
- Headlines: Numbered list with hook score
- Notes: 3 variations (short/medium/long)
That’s it. The entire workflow is documented. The agent executes it without you managing the handoffs.
What Is the Context Layer and What Files Do You Actually Create?
The context layer is where most creators stall. Not because it’s technically hard, but because it forces you to articulate things you’ve kept implicit: who you are, who your reader is, and what you’re actually trying to build.
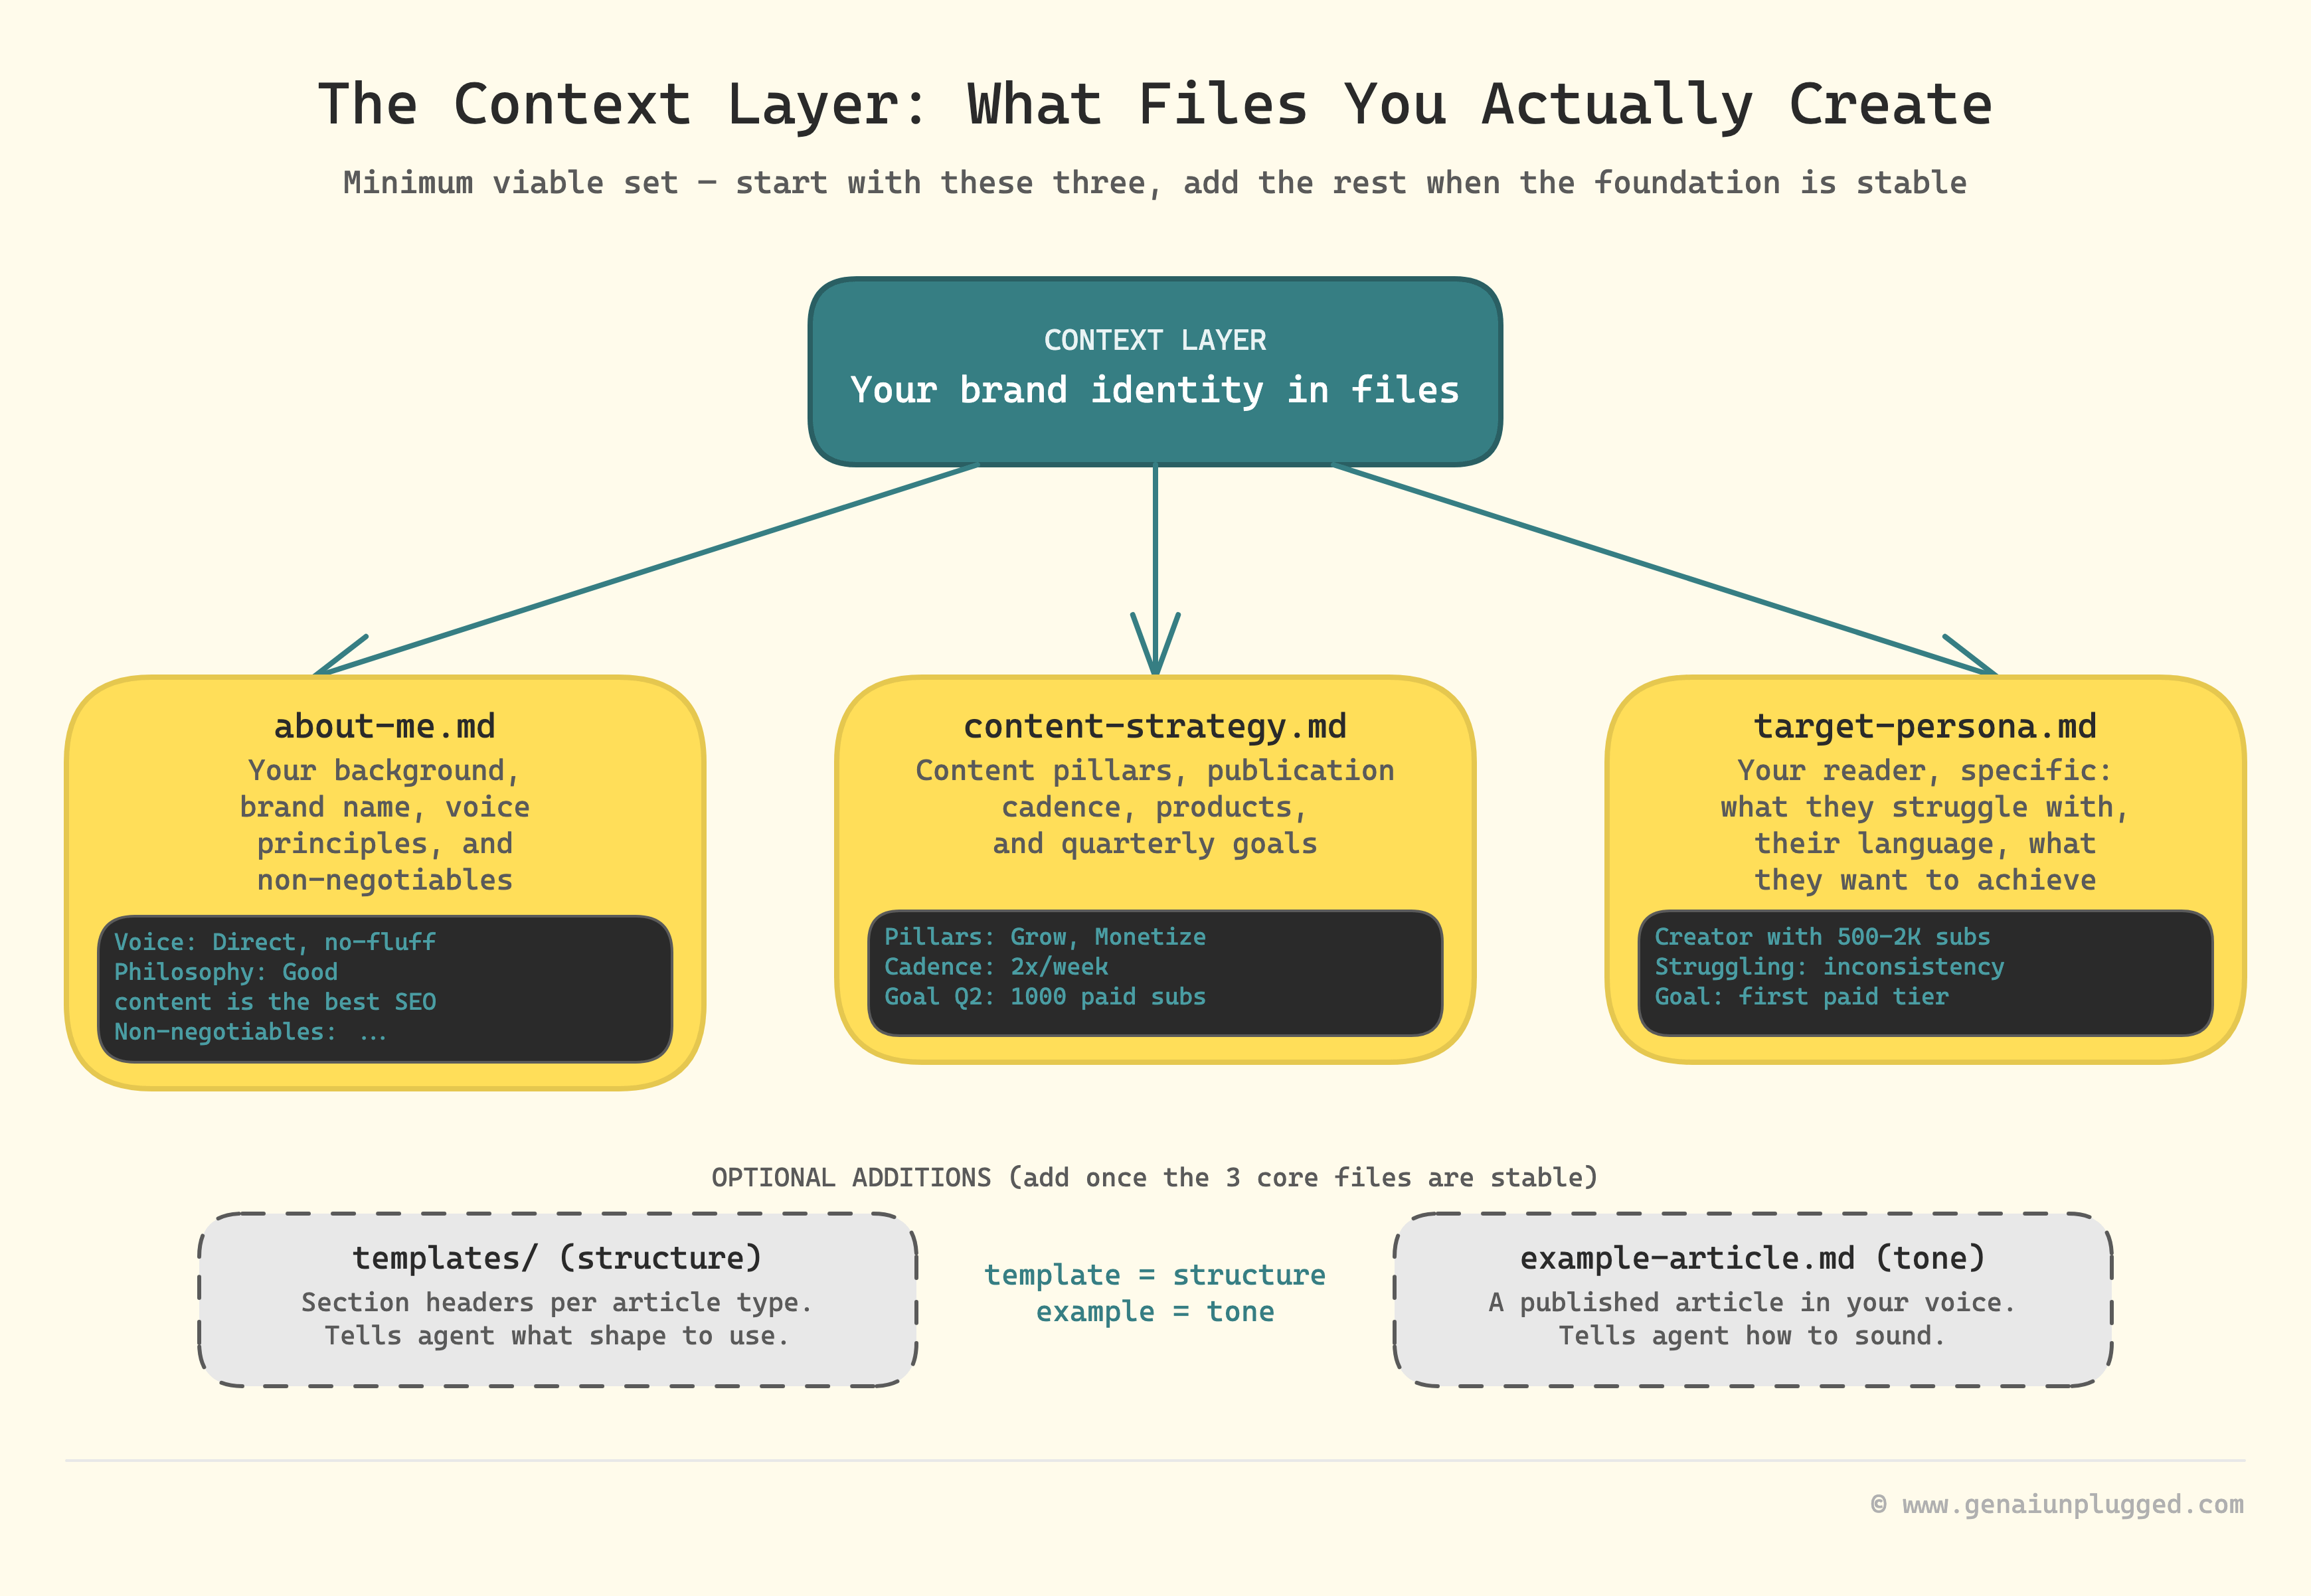
At 22:01, I walked through the specific files. Here’s what each one contains:
About Me file (about-me.md)
Your background, your brand name, your writing voice principles, your non-negotiables. For Timo, this would include his “good content over SEO” philosophy, his personal-experience-only content approach, and his conversational writing style. One to two pages. Not a bio, a working document.
Here’s a short example of what a completed About Me file looks like:
# About Me

Name: Timo. Publication: Write Your Way to Wealth.
Audience: Newsletter creators who want to grow and monetize.
Voice: Direct, practical, no-fluff. I write from personal experience only.
Philosophy: Good content is the best SEO. I don’t optimize. I publish.
Non-negotiables: No listicle clickbait. No vague AI hype. Real results or silence.
Products: [Paid newsletter tiers]. CTA style: honest offer, specific outcome.
If you’re unsure how to surface your own content DNA, extracting your newsletter’s DNA with Claude Cowork is a structured process that produces exactly these files in under an hour.
Content strategy file (content-strategy.md)
Your content pillars, your publication cadence, your products, and your quarterly goals. This gives the agent strategic context so it doesn’t suggest content that pulls against how you want to be known.
Target persona file (target-persona.md)
Your reader, specific. Not “newsletter creators” but the person who subscribed last week: what they’re struggling with, what language they use, what they want to achieve. One detailed profile beats five vague ones.
Article format templates (templates/)
These are structural scaffolds for your article types, not full examples. A how-to template has different section headers than a personal story or a listicle. Templates tell the agent what shape to use. A published article in your voice tells it what tone to use. Both belong in context, but they do different jobs.
One distinction worth making: a template is structure, an example is tone. Don’t confuse them.
How Does the Substack MCP Eliminate the Last Manual Step?
The Substack MCP is a custom integration server that connects Claude directly to Substack’s publishing system.
Once configured in Claude Cowork, your content agent can create, schedule, and publish Substack Notes and post drafts without leaving the Claude interface, eliminating the final copy-paste step in the workflow.
I launched this MCP the day before recording this session. At 54:03, I walked Timo through what it actually provides:
Create, publish, edit, list, and delete Substack Notes
Manage post drafts
Access subscriber stats and dashboard data
For Timo’s workflow specifically: the final manual step, copying polished content from Claude into Substack, disappears.
The agent writes the Note, schedules it, and publishes it without leaving the Claude interface. His separate GPT for Substack Notes becomes unnecessary. The entire pipeline, from outline trigger to published note, runs inside one unified agent.
You can read how the Substack MCP server was built for the technical background. The MCP is available at substackmcp.genaiunplugged.com and is free for all GenAI Unplugged subscribers.
How Long Does This Take to Set Up?
The context layer takes two to four hours on the first pass. Writing your About Me file, content strategy, and target persona means articulating things you’ve kept implicit: who you write for, what your content stands for, what makes your voice specific. This is the work that determines output quality for every article after.
Once those files exist, the rest moves quickly. Connecting Notion takes ten minutes. Writing your Claude.md takes thirty minutes (especially if you dictate it first and have Claude structure it).
Registering your existing skills as Cowork modules takes another fifteen minutes. The Substack MCP setup takes under ten minutes.
Total first-time setup: three to five hours. After that, adding a new skill or adjusting your workflow is a one-line change to Claude.md.
“The context layer is the hardest part. And once that is there, everything is like more or less just kind of copy-pasting.” - Timo (at 1:05:35)
You pay the setup cost once. Every article after that runs on the foundation you’ve already built.
Common Setup Issues
Notion database not found.
Cowork connects to your Notion workspace but only sees databases you’ve explicitly shared with the integration. Open Notion, go to Settings, then Connections, find your Cowork integration, and share each database individually.
Substack MCP authentication fails.
The MCP uses your Substack session cookie for auth. If it fails, clear your Substack session, log back in, and re-run the MCP setup at substackmcp.genaiunplugged.com. Safari users: copy the cookie value from developer tools rather than using the browser extension.
Claude.md instructions are ignored.
If your agent isn’t following the startup protocol, check that the Claude.md file sits at the root level of your Cowork project folder, not inside a subfolder. The agent looks for it specifically at the top level.
Skill not recognized during workflow.
If a registered skill isn’t being called, confirm it’s listed in your Cowork skill library (Settings, then Skills) and referenced by its exact registered name in your Claude.md.
If you’re spending 10-15 minutes per article on copy-paste handoffs between separate Claude projects, that’s 60-90 minutes a month for a twice-weekly publication. Time that compounds into hours when you account for the re-explanation overhead every time you switch contexts.
Get PluggedIn
If you’re building AI content workflows on Substack, the unified agent I walked through with Timo is the starting point. The PluggedIn tier covers the full setup: the exact context files, Claude.md templates, and MCP configurations I use.

Every month without the context layer costs you 60-90 minutes in manual handoffs. Time that resets from scratch every time you switch projects.
FAQ
What is the difference between Claude Cowork and Claude Projects?
Claude Projects gives you a persistent workspace with a knowledge base and a system prompt. Claude Cowork adds an agentic layer on top: you can connect MCP servers (like Notion and Substack), use skills as reusable modules visible across all projects, schedule automated tasks, and trigger execution from mobile via Dispatch.
Projects are for single-step tasks where you manage each handoff. Cowork is for multi-step workflows that run without you directing every step.
What files do I need to create for the context layer?
At minimum, three files: an About Me file (your background, brand, voice principles), a content strategy file (pillars, cadence, products, quarterly goals), and a target persona file (specific reader profile).
Optionally add article format templates for each content type you write, and one published article as a tone reference. These files become the knowledge base your agent draws from before writing anything.
Do I need coding skills to build this content agent?
No. The setup involves selecting a local folder in Claude Cowork, writing your workflow in plain English in a Claude.md file, and connecting the integrations you already use (like Notion). The recommended approach: use Whisperflow or Mac dictation to narrate your entire workflow out loud, then ask Claude to structure that transcript into a Claude.md file. The agent writes the instructions for itself.
What is the Substack MCP and how does it work with Claude Cowork?
The Substack MCP is a custom MCP server (substackmcp.genaiunplugged.com) that connects Claude directly to Substack. It provides 11 tools including creating, publishing, editing, and scheduling Substack Notes plus post management and subscriber stats. Once connected as a Cowork integration, the agent can publish directly to Substack without any copy-paste step. Available free to all GenAI Unplugged subscribers.
Can the agent automatically start writing without me triggering it?
Yes. Claude Cowork’s scheduled tasks feature lets you write an instruction telling the agent to check your Notion content calendar, identify the next article due, and start the workflow on a set schedule. Once configured, adding an article to your Notion calendar is all you need to do. The agent handles the rest.
What is a skill in Claude Cowork and how is it different from a project?
A skill is a reusable, modular prompt or procedure that any Cowork project can call as a step in a workflow. In the unified agent approach, tools like Headline Hero, Internal Linker, and CTA Linker each become skills the single agent orchestrates in sequence, instead of separate projects requiring manual switching and content re-pasting between each one.
How does the Notion integration work in this workflow?
Notion connects as an MCP server in Claude Cowork. Once enabled, the agent can query your Notion databases mid-workflow: fetching your published articles list for internal link suggestions, checking your content calendar to identify the next draft to start, or pulling product details for CTA placement. Enable the Notion connector in Cowork’s settings and reference it in your Claude.md instructions.
Key Takeaways
The problem is orchestration, not tools. Timo’s workflow already had strong individual tools. The friction was managing the handoffs between them. A unified agent eliminates the switching, not the tools.
Context layer quality determines output quality. Rich, specific context files (About Me, content strategy, target persona) produce more on-brand output than fragmented per-project prompts. This is the most valuable investment in the entire setup.
Templates and examples do different jobs. Templates give the agent structure (what sections to write). Examples give it tone (how to sound). Both belong in your context layer, but confusing them produces worse results.
Write your Claude.md in plain English, not code. Dictate your existing workflow out loud, then ask Claude to structure it into an agent file. The more detail you include about your actual process, the better the agent performs.
The memory layer compounds over time. Every consistent edit you make to the agent’s output becomes a preference it applies automatically. The agent gets better with every article, without you re-explaining preferences.
The Substack MCP eliminates the last manual step. Direct publishing from Claude to Substack closes the loop on the entire pipeline. From outline trigger to published note, nothing requires leaving Claude.
The setup cost is front-loaded. Three to five hours of context-layer work, paid once. Every article after runs on that foundation. The ROI calculation is favorable after three articles.
Resources Mentioned
Claude Cowork: Primary tool demonstrated. The agentic upgrade to Claude Projects, enabling skills, MCP connectors, scheduled tasks, and mobile execution via Dispatch.
Substack MCP: Custom MCP server for direct Substack publishing from Claude. 11 tools including Notes creation, post management, and subscriber stats. Free for GenAI Unplugged subscribers.
Notion: Used as article database (for internal linking) and content calendar (for scheduling triggers). Connects via MCP in Claude Cowork.
Tavily: Research connector for creators with a research phase. Not needed for personal-experience workflows like Timo’s.
WisprFlow: Mac dictation tool recommended for narrating your workflow into a Claude.md file.
GPT Image 2.0: Image generation tool Timo uses for thumbnail creation. Post-upgrade, requires 1-2 reprompts instead of 5-7.
Claude Code: The technical alternative to Claude Cowork. Same 4-layer architecture applies, but agents live in
.claude/agents/folder structure instead of Cowork projects.
Your 15-Minute Challenge
Open a new document and write three things without stopping:
Your current AI content workflow, every step, every tool, every copy-paste moment. Don’t organize it yet. Just list it.
What you know about your reader that you’ve never written down explicitly.
One sentence describing what makes your content different from everyone else in your niche.
That’s the raw material for your context layer. You now have the hardest 20% of the setup done. The rest is connecting it in Claude Cowork and writing the Claude.md file to orchestrate it.
Watch the full session recording to see the live Cowork setup demonstration (starting at 49:30) and the Substack MCP reveal (54:03). The setup takes less time when you can see it happening in real-time.
Success criteria: by the end of 15 minutes, you have a first draft of your About Me file. Everything else follows from that.


